Wednesday, May 30, 2012

Simplicity 2189 Brown Knit Dress and Some Exciting News!

I hope everyone had a great Memorial Day weekend. I certainly did! I got to see a friend I hadn't seen in a couple of years Saturday night and my boyfriend and I enjoyed an evening with no children Sunday night (a rarity since we each have two boys and unheard of for them all to be elsewhere all at the same time). My boyfriend officially popped the question (and of course I said yes).

My lovely engagement ring! It is part of a bridal set and the wedding band will 'lock' in with the engagement ring when we do get married.

It will be a few years before we actually get married, probably after I get my Bachelor's degree, but that's a good thing since I would go crazy trying to plan a wedding on top of going to school.


source: sewing.patternreview.com


I finished my first try at Simplicity 2189 (the maxi dress) and overall I am happy with it. I think I may add a bit more length next time and I adjusted the bust area on my pattern so hopefully the armholes won't gape.

Front View

Ignore the messy sewing room - I have to sweep. I did not incorporate the side seam slit as the pattern directs, because I didn't really want one, and there is no problem walking in the dress without it.

Back View


I serged all the seams, and I am feeling pretty confident with the basic overlock stitch now. I tried to use the coverstitch on the neckband, but the seam at the center back was just too bulky so I gave up after two horrid tries and just used my regular machine on the neck and armbands. I did use the coverstitch for the hem, and again I had issues at the side and center back seams, but I pushed through them (since they were a bit less bulky). I am fairly pleased at the result, even if it's wonky at the seams, it is perfect everywhere else!

Coverstitch and serged seams.

I am going to tidy up the sewing room and spend my afternoon with a book. Not sure how much sewing I will do this week, since my head is all abuzz with wedding ideas (even if it's a few years away). I am seriously contemplating sewing my wedding gown, and have a vision of what I want in my head, but I'm not sure I can draw it out. If I do manage a semi-decent sketch (or even a bad sketch that gets the idea across) I'll share it with you all.

Saturday, May 26, 2012

Goodies

So here are the goodies I got last week (I also got the lining for my pants and 2 half yards to finish my patchwork skirt, but those are not in this picture)...


The purple fabric is simply gorgeous, the photo does not do the color or texture any justice at all. It's a poly shantung, and will end up being a shirt dress made from McCall's 4769. I really wanted to get a silk dupioni, but I refuse to have fabrics in my wardrobe that have special washing requirements. If it can't be gently washed in the washer, I will end up ruining it, so I got the next best thing. The silver fabric is 'Silkessense' and it is soooo soft to touch. It will become a blouse from Vogue 8772. I'm stoked about the jeans pattern, and plan to get some fabric for them in the next couple of weeks.

And this is what I came home with this week for patterns...


As well as this fabric...


The top three are knits, the blue and grey will end up as a tee shirt from Butterick 5215 and the other two knits will be dresses from Simplicity 2189. The floral camo is a silky fabric that I am going to do a test run of the shirt dress with and the red floral is a cotton that I'm going to make a test of the Vogue blouse with (before cutting into the pretty silky and significantly more expensive fabrics in the first picture). All five of these came from the clearance shelf, which were on sale beyond the regular clearance price so they were a steal.

I hope everyone has a safe and enjoyable Memorial Day weekend!


Friday, May 25, 2012

Weekly Round Up - 5/26

Before I get on with sewing stuff, I got my final grades for the semester this week. I'd like to say I did pretty well this semester, considering the classes I took. I got A's in both my math classes, and B's in my physics and history class. Now on to the good stuff...

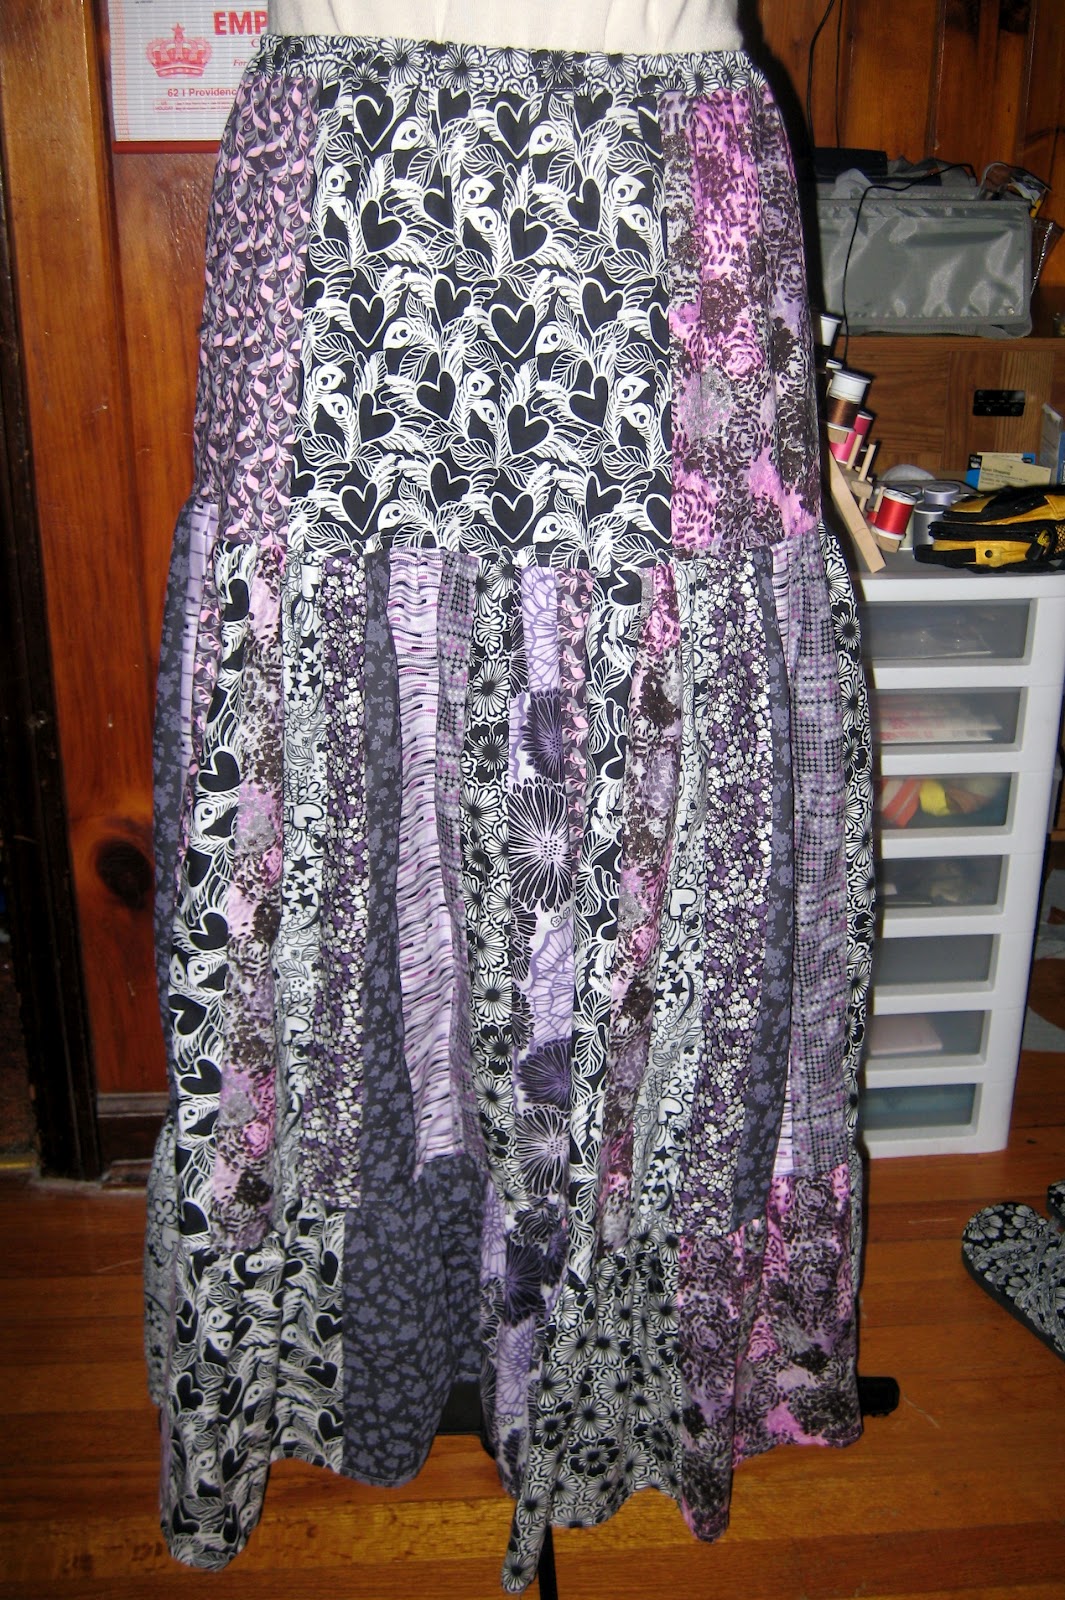
I finished my patchwork skirt, which I blogged about here.


I also finished a pair of slacks using Vogue 2907

V2907
source: voguepatterns.mcall.com

I love the style of the pants, but I think there may have been more ease built into the pattern than I like. They just feel a little too big. I made a 14 which is technically my size, and in the handful of pants patterns I have made in the past, with no sizing alterations at all, I have not been disappointed in the fit. I fortunately grabbed a 10-12-14 envelope when I purchased this, so I will be trying them a size or two smaller next time, I just need to find where on the pattern Vogue places the finished measurements. That is one thing that annoys me to no end about some pattern companies - you have to hunt for the finished measurements. I definitely prefer them on the pattern envelope, since I will occasionally go up or down a size based on the ease, and hiding them inside on pattern pieces makes it impossible to determine the better sizing to go with.

Back view


I meant to do view A, with the tabs and buttons on the waistband, I really did. When I got to attaching the waistband pieces, I forgot to add the tabs and did not feel like pulling the seams just to add them. I intentionally left off the welt pockets and piping detail for the front pockets, I hadn't made this pattern yet and this was my test run, which I did not feel like dealing with those particular details this time around. The only changes I made to the pattern was to have a cut on fly, since I prefer that method for attaching the zipper, and I made a pocket facing so that I could make both pocket pieces out of the lining fabric. I decided that I need to invest in some invisible thread, I'm not at all pleased with how my hook and eye hand stitching looks.


I do love the lining fabric I chose, even if no one will see it. I am also very proud of how well I matched my stripes at the pockets and front waistband.

The waistband stripes match up almost perfectly, much better than this pic shows, and even though the one pocket looks off in the pic, both pocket stripes match perfect.


I do not know how often I will wear these pants, they do fit well enough to stay up,I just feel like I don't fill out the hip and bootay area enough for them to look great on me, although my parents did say they look fine. I had originally asked my mother to help me pin the crotch some more to try and get rid of some of the droopiness, but she convinced me that wasn't going to help them fit the way I wanted.

Front view


I started making a drapey, cowl neck-ish, tank top from a knit remnant I picked up a while back. I drafted a very simple basic pattern using the idea from Morning by Morning Production's post here. I did not add extra length or width though, I didn't have a lot of fabric to work with and didn't want a very low neckline. It's almost done, except there is a bit of gaping at the bust/arm scythe area.


I am trying to figure out how to fix that without a dart before finishing it off. All that is left to do is finish the neck and arms and hem the bottom. It was super simple and very quick to put together. It was also my first experience sewing with a knit. I don't know why I had found knits so intimidating, it was not a very challenging fabric to work with at all.

I'm off to JoAnn's today...again...for yet another pattern sale. After this trip I will be good with my pattern wants/needs/ for some time I do believe (except for one, that I will eventually download since it doesn't seem to be available in print). I did get some goodies last week, but I'll post them in the same post as I do the goodies I'm getting today. Maybe I'll get to that tomorrow - I haven't taken any pictures of the fabric I got last week yet, and it is yummy.


Projects Completed


Black/Purple/Grey Patchwork Maxi Skirt (for me) - summer swing skirt tutorial from Moda
Pants - Vogue 2907 view A

Works in Progress

Black/Purple/Grey Patchwork Maxi Skirt (for me) - summer swing skirt tutorial from Moda
Pants - Vogue 2907 view A
Knit drapey tank - inspired by Morning by Morning's drapey tank tutorial

Projects To Do

Blouse - Vogue 8772 - grey silky solid in stash
Shirt Dress - McCall's 4769 - purple poly shantung in stash
Sandals (for a friend) - inspired by an etsy tutorial
Dress - Coffee Date Dress, free Burda pattern - black/white silky print in stash
Peasant Top - Simplicity 3956 - teal paisley print in stash
Pants - Vogue 2907 view A - green suiting in stash
Purse (for a very deserving friend) - my own design - no fabric chosen yet
Men's Bi-Fold Wallet (requested by a friend) - my own design - no fabric chosen
Purse (for me) - my own design - no fabric chosen yet
Wallet (for me) - my own design - no fabric chosen yet
Dress - Simplicity 3506 view A - black/purple silky print in stash
8 Gore Skirt - self drafted pattern - cream suiting in stash
Top - princess seam bodice - red silky solid in stash
Bolero - Simplicity 3921 view ? - green velvety fabric in stash
Top - Vogue 2987 top - multi-colored knit/jersey/stretchy in stash
Jacket - Vogue 2987 jacket - no fabric chosen
Dress - New Look 6020 view ? - no fabric chosen


Thursday, May 24, 2012

Patchwork Skirt


I saw the Summer Swing Skirt tutorial on Moda and knew I had to make one, just in more muted colors. I originally planned on it being black and white, until I came across a bundle of black and white fabrics with some purple and pink mixed in at Wal-Mart. Rather than buying a layer cake (10" x 10" pre-cut squares), which wasn't available there anyways, I got a fat quarter bundle (8 FQ's) and a small jelly roll (24 - 2 1/2" strips). I originally intended to use 4 large squares on my top layer (11" x11") but I was lucky to get 2 - 11" x 10" blocks out of each fat quarter so I went with plan B and needed 5 blocks for the top tier, otherwise I doubt it would have fit my hips very comfortably, if at all. This meant I needed more fabric, so I bought two additional 1/2 yards that complemented the original set, and were on sale at JoAnn's. I think I spent $25 on fabric for this skirt.


In the end,I used 10 different fabrics. The top tier consisted of 5 blocks 11" tall by 10" wide, the second tier has 50 strips 2 1/2" wide by about 19" long, and the bottom tier has 15 blocks 11" tall by 10" wide. I also used some of the excess fabric from one of my 1/2 yard lengths to make a waistband. Each tier was made with 1/4" seams connected the pieces, but I did use a 1/2" seam to connect the tiers to each other (the thought of all that gathering in a 1/4" seam allowance was not very appealing to me).

I used my sewing machine to do most of the gathering for me by using a basting stitch with a very high tension, and then I only had to slightly adjust the gathering to fit. A definite time saver when the gathers don'y need to be perfectly even.

I honestly doubted I would like this skirt part way through the construction, so much so that I almost put it aside. But I pushed on, determined to finish it, since I know that things never look quite right before being finished. When it was done I liked it, but wasn't sure how often I would wear it. Since it was finished and I was going out with my boyfriend for dinner, drinks, and some karaoke that night, I decided that it was as perfect a time as any to wear it. By the end of the night I loved it. Isn't it funny how sometimes an okay item really grows on you by simply wearing it out and about?


Will I wear it again? Absolutely! Will I make another? Not anytime soon. It was definitely more time consuming than most skirts simply because of the patchwork (there are 70+ seams!!!), and patchwork is tricky for me to have it look like something I want to wear - and be seen wearing - in public. But I may make another down the road, after I forget how tedious this one felt to make.

Tuesday, May 22, 2012

Make Your Own Sandals ~ Tutorial

A friend asked me to make her some sandals and I was inspired by this post on etsy to use flip flops as a base and then cover a cut up yoga mat with fabric as a 'top' and sandwich the straps between. I went on the hunt for supplies and inquired about what glue to use. A very helpful associate at the JoAnn's I visited recommended E 6000. This stuff is industrial strength, waterproof, and flexible, perfect for this project. Now, the directions are clear for use on non-porous surfaces, but there are no recommendations on the packaging as to how to use it on porous surfaces (like fabric). I used the trusty Google search to find how to properly use this stuff with fabric and came across this tutorial by Flamingo Toes, which is very similar to what I was thinking, except she used 'fusible batting' and 'heavyweight interfacing,' which, in my opinion, is better than a yoga mat simply for the cost, so I used that idea. Her sandals look great, and I may make a pair down the road similar to hers - I love the flower embellishment. I ended up using fusible fleece and pellon 926 stabilizer, which I usually always have in my stash. My method is similar to Flamingo Toes' for putting the sole together, but I went about my straps differently than she did.


Materials


Flip Flops
Fusible Fleece - amount depends on the size of the flip flops used
Pellon 926 (or similar weight stabilizer) - amount depends on the size of the flip flops used
Fabric - a fat quarter should be plenty for any sandal size
Material for straps (fabric, cording, leather, bias tape, etc.) - amount depends on design
Liquid Stitch
E 6000 Glue
Scotch Tape
Pins
Optional:
embellishments
elastic (for fitting around ankle/heel)
velcro (closure)
small buckles (closure)
snaps (closure)

Directions


Cut off the straps of your flip flops. Keep the soles and the nubs from the bottom (I didn't think of this until after I threw mine away). At some point you can glue the nubs back onto the bottom of the soles with the E 6000, so they do not poke up through the top, but so that there are no holes in the bottom of the sole.

Using one of the soles, make a pattern by tracing it onto a piece of paper and then cutting it out.

Using your pattern, cut out two pieces of fusible fleece and two pieces of stabilizer, being sure to flip the pattern over for the 2nd piece, so you have opposite or mirrored pieces. Cut two pieces from your fabric, again being sure to mirror them, but make sure cut these larger than the actual pattern. I had a 3/4" - 1" extra on all sides. Hold on to your pattern, you're going to use it again a little later.


Place the fusible side of the fleece (the rough side) on the wrong side of your fabric, and iron it to the fabric according to the package directions.


With the right side of the fabric down, align the stabilizer on top of the fleece and pull the excess fabric to the back, securing it to the stabilizer with the liquid stitch as you go. You could also run a basting stitch around the outside of the fabric and gather it to the back if you prefer.


Place one fabric sole right side DOWN, place a piece of paper on top of it, then place the other fabric sole, right side UP, on to of the paper (the paper will prevent the fabric soles from sticking together while the glue sets). Put some weight on top of them to make sure none of the gathers/folds get wonky while it sets, and allow the glue to set (approximately 30 minutes). 

Note: You don't have to use the liquid stitch, but it will save you the headache of fussing with the folds/gathers as you assemble your sandals.

I probably didn't need all three books, but here's a glimpse at what I wave been reading for the past 4 months (plus two US History books).

While the liquid stitch sets, prepare your straps. For my sandals I cut three strips, 44" long and 1 1/4" wide, folded them in half (lengthwise) and ironed, then opened them up folding the edges to the center and ironing, then refolding in half and ironing again, giving me straps a little thicker than 1/4". You could also use a bias tape maker. Once my strips were folded I stitched down each side and the center and cut each strip into four pieces.

You could do a 3, 5, or 7 strand braid for your straps; buy biased tape and simply stitch it closed; buy some cording or leather strips, which would require no prep work; and I'm sure there are many other options I'm not thinking of at the moment. Your straps can be 1/4" thick or 2" thick or any other thickness you want. If you want to use buckle closures, or elastic around the heel, keep their sizes in mind when determining your strap width. Look at the variety of sandals and the strap styles out there for inspiration if you need to. The whole point is to make them a style that you like.

Once the liquid stitch is set and you have your straps ready to go you can start to assemble your sandals. If you are using elastic or buckles or velcro, this is when you will be planning on their placement as well. For buckles, you should also plan where you are going to place holes (an eyelet stitch would work well for this) and make sure to allow for them as you lay out your straps. If you wanted a 'toe thong' (is that even what it's called?) where the straps go between your toes, you should be able to do this by making a button hole where you want the straps to go through the fabric sandal. Taking one fabric sole, place the appropriate foot on top of it and loosely lay your straps on your foot, to get an idea of how well your initial design is going to work.

When you are happy with the layout (and added a hole for the toe thong if needed), use scotch tape to secure one end of each strap to the underside of the fabric sole (with about 1" of the strap underneath) at the points you want your strap to start. Do this for every strap piece and then lay them over your foot, so that your foot is secure, but not so tight you won't be able to slide your foot in and out. Use a pin to carefully secure the other side of each strap to the fabric sole, then remove your foot and use scotch tape to secure the straps to the bottom of the fabric sole and remove the pins.

Ignore my ancient dingy cutting mat (that thing is about 20 years old now!)

Place you paper pattern in the strapped sandal and using a pen or pencil mark where the straps are, then remove the paper pattern piece and using transfer paper or a permanent marker, make sure the marks show through the backside of the paper. If you did a toe thong, you will need to cut a slit in the top of your paper pattern for it to slip through. Use this to place your straps on the other fabric sole. Attach the straps with scotch tape on one end, using the pattern as a guide, Place straps over your foot, matching with the marks on the pattern, and secure with pins on the second end. Again, use scotch tape to secure the straps to the underside of the fabric sole and remove the pins.


Compare the sandals by placing them bottom to bottom and make sure they are similar (small differences shouldn't matter). Also try both of them on (I didn't and one is a little looser than the other - oops). If they need adjusting do so.


Once you are happy with the straps, place a single dot of liquid stitch between each strap and the underside of the fabric sole, just under the edge of the sole, leaving the scotch tape on for now. This is to secure the straps in place so that they don't move when you attach the fabric sole to the flip flop sole. Allow the liquid stitch to dry.

Once the liquid stitch is set you can remove the scotch tape from the underside of the fabric sole and trim the straps so they are about 1" from the edge. And now your fabric sole is ready to be attached to the flip flop sole!


I applied the E 6000 glue about 1/4" from the outside edge and then criss-crossed the sandal on about 1/4" intervals. Next time I would go a little closer to the outside edge. After applying the E 6000 to one sole, carefully place the fabric sole on top and press over the entire area with your hand. Repeat for the second sole. Once both soles are glued and hand pressed, place them under some weight and allow the glue to set (I waited overnight).


The next day you can add any embellishments you like...Congrats! You just made your very own sandals!!!


I really do like these sandals, I have worn them a few times now and they seem to be holding up just fine.

I did my best to explain everything clearly, but if you have any questions feel free to ask.

Friday, May 18, 2012

Some Sandals, A Purse, And Other Random Bits


I did not get much as sewing accomplished this week as I had hoped to, but I did tear apart my sewing room and then (mostly) reorganized and rearranged it. I definitely like the set up now. It felt crowded before, where now I feel like I have room to move.

My serger (pictured below) is behind me in this pic

These pictures don't show the whole room, there is an ironing board to the right of the serger, and to the left of the sewing machine is a pile of empty boxes I need to break down...I did say I got it mostly reorganized.

My sewing 'nook' is behind me in this pic

I did finish my test pair of sandals. They worked out pretty well I think. I will post a tutorial for how I did them sometime next week.


I also (finally) finished the purse I told my sister I would make for her well over a year ago. She's been a sport and has not harassed me about it once, so I think she was definitely deserving of me doing it before I got elbow deep in projects for me. In my own defense, I did start it last summer, but did not manage to finish it before the Fall semester started, and over the winter break, the only sewing I did was Christmas gifts.

The inside...this purse has lots of pockets

I absolutely love the fabric, and wish I had gotten more at the time (it was a Wal-Mart fabric that was available for only one or two seasons about two years ago). It would make a really lovely dress or skirt. Oh well, I do have just enough to make myself a wallet, and a new wallet for me is on my to-do list...

I told you there was a pile of boxes over there - ignore them

Do you see what the purse is hanging on??? I finally got a proper dress form. It was a Mother's Day gift, and I love it. I followed the suggestion of a comment on Amazon and set the bust smaller than my actual size, then added a padded bra to give the bust area a truer to life look and sizing. With the bra, the bust is the proper size and isn't too wide along the back. I also 'dressed' her so that if I need to pin in the gaps from sizing the form I would be able to do so. I will probably get a mock neck specifically for her and fit it with princess seams, but that's a project for another day. She needs a name....not quite sure what I should call her yet...

I did get the fabric I have for my patchwork skirt cut, but I decided I need a little bit more fabric for it to fit comfortably, so it's been put on hold. I also got the main fabric cut out for one pair of pants I am making from Vogue 2907. I want to say the fabric I cut is a grey suiting, it looks grey next to the green suiting I have.


On its own, I think it looks like it has a hint of green, but it could just be the horrid lighting in the sewing room. Either way, I don't have a large enough piece of anything I like in my stash for the lining fabric for this pair, so another project on hold. But, I am making my way to JoAnn's today for this week's pattern sale, so I should be able to get the fabric I need.

Speaking of patterns, I did get to last week's sale and got four patterns -

McCall's 3129
M3129
Source: mccallpattern.mccall.com

McCall's 4769
M4769
Source: mccallpattern.mccall.com

Vogue 8772
V8772
Source: voguepatterns.mccall.com


Vogue 8788
V8788
Source: voguepatterns.mccall.com


Projects Completed

Sandals (test pair - for me)
Purse (for my very patient sister)

Works in Progress

Purse (for my very patient sister) - my own design
Black/Purple/Grey Patchwork Maxi Skirt (for me) - summer swing skirt tutorial from Moda
Pants - Vogue 2907 view A

Projects To Do

Black/Purple/Grey Patchwork Maxi Skirt (for me) - summer swing skirt tutorial from Moda - FQ's and strips now in stash
Sandals (for a friend) - inspired by an etsy tutorial
Pants - Vogue 2907 view A - grey suiting in stash
Dress - Coffee Date Dress, free Burda pattern - black/white silky print in stash
Peasant Top - Modern sewing patterns free pattern 5300 - teal paisley print in stash
Pants - Vogue 2907 view A - green suiting in stash
Purse (for a very deserving friend) - my own design - no fabric chosen yet
Men's Bi-Fold Wallet (requested by a friend) - my own design - no fabric chosen
Purse (for me) - my own design - no fabric chosen yet
Wallet (for me) - my own design - no fabric chosen yet
Dress - Simplicity 3506 view A - black/purple silky print in stash
8 Gore Skirt - self drafted pattern - cream suiting in stash
Top - princess seam bodice - red silky solid in stash
Bolero - Simplicity 3921 view ? - green velvety fabric in stash
School Bag/Backpack - my own design - no fabric chosen (decorator suede or a faux leather possibly)
Top - Vogue 2987 top - multi-colored knit/jersey/stretchy in stash
Jacket - Vogue 2987 jacket - no fabric chosen
Dress - New Look 6020 view ? - no fabric chosen


Friday, May 11, 2012

Preview of Next Week


So the semester is this close to being over...I have one last take home final to complete and submit on Monday, then I am free from homework and textbooks, for a few months at least. And that means I get to play in my sewing room. Although, I should probably tidy it up a bit before I go making more of a mess in there.

Quite some time ago (a year, maybe even two years ago), a friend asked me if I could make her a pair of sandals that wouldn't hide any of the tattoo on her foot. I had visions of playing with leather, but could not find a small piece of soling leather and we did not want to invest in a huge piece for two pairs of sandals (of course I would need a pair too). The project eventually slipped my mind. Then, a couple weeks ago, I came across this tutorial (while distracting myself from some homework assignment) and was reminded of the sandals I never made. Yesterday, I was wandering around Wal-Mart and JoAnn's between exams and got some goodies to make myself a test pair, as well as fabric for a patchwork skirt like this one. Today, I may be taking advantage of the pattern sale at JoAnn's. If not, I will make my way there this weekend. Here's a peek at what I picked up yesterday...


Over the summer I would really love to get some clothes made for me that I truly love AND fit well. In the past, I rarely bothered with messing with a pattern at all, I would cut my size and sew it as is. I have never made a muslin, and in a number of the dresses I've made it shows in the fit of the bodice. I have been fortunate with pants so far, but I want to concentrate on making well fitted garments, which means I can't just charge in head first (which is my preferred method). If I can get a proper dress form, I want to try some draping. I've watched a few videos of people creating on the dress form and am in awe. I would also like to get more comfortable with my serger, which I got right before this school year began, so I haven't had much opportunity to play with it.

I hope everyone has a great Mother's Day weekend, and I'm hoping to have something of substance to post next week!

Projects Completed

None!

Works in Progress

Purse (for my very patient sister) - my own design - black & white cotton butterfly print

Projects To Do

Black/Purple/Grey Patchwork Maxi Skirt (for me) - summer swing skirt tutorial from Moda - FQ's and strips now in stash
Sandals (for a friend, but starting with a test pair for me) - inspired by an etsy tutorial
Pants - Vogue 2907 view B - grey suiting in stash
Dress - Coffee Date Dress, free Burda pattern - black/white silky print in stash
Peasant Top or Circle Shirt - pattern not chosen - teal paisley print in stash
Pants - Vogue 2907 view A - green suiting in stash
Purse (for a very deserving friend) - my own design - no fabric chosen yet
Men's Bi-Fold Wallet (requested by a friend) - my own design - no fabric chosen
Purse (for me) - my own design - no fabric chosen yet
Wallet (for me) - my own design - no fabric chosen yet
Dress - Simplicity 3506 view A - black/purple silky print in stash
8 Gore Skirt - self drafted pattern - cream suiting in stash
Top - princess seam bodice - red silky solid in stash
Bolero - Simplicity 3921 view ? - green velvety fabric in stash
School Bag/Backpack - my own design - no fabric chosen (decorator suede or a faux leather possibly)
Top - Vogue 2987 top - multi-colored knit/jersey/stretchy in stash
Jacket - Vogue 2987 jacket - no fabric chosen
Dress - New Look 6020 view ? - no fabric chosen


Friday, May 4, 2012

Hello...again

I had started this blog about two years ago and, in spite of my good intentions, I rarely made any posts. I decided I want to try this again, from scratch....

A Little Bit About Me

I'm Kelly, a mother and full time college student with a love for fabric and, more recently, yarn. I first learned to sew when I was about 12, but it wasn't until about four years ago that I really began to get into sewing again. Other than some basics on how to use a sewing machine, making some basic quilt blocks, and one very ugly pair of shorts made in middle school home ec., I am completely self taught. And just last year I began teaching myself to crochet. Unfortunately, during the school year, sewing, and all other forms of crafting, are pushed to the back burner.

I am currently going to school full time, working towards a B.S. in Mathematics and my Secondary Teaching Certification. I am one semester away from my AS in General Studies (boring I know, but it allowed me the most flexibility with the courses I could take) and then I am transferring to ECSU, where I will hopefully be able to complete the requirements for both my degree and certification within 3 1/2 years after transferring. I will also, eventually, get my Masters, but that is even further down the line. It's still a long road, but I am very excited to be approaching that first milestone!

What I Want From This Blog

I want to document my successes (and failures) and hope that in time I can look back and see growth in my abilities and techniques as a sewer. I want to try and give myself some goals and deadlines so that I make more time for sewing (or other crafts). I truly love the process of creating and hope that I can reward myself with time to enjoy my craft even during the demands of the school year. I'd also like to improve my photography skills...I did take some classes back in high school, but I'm afraid that I don't remember all that much from them, but I do know I have horrible lighting in my house, so please bear with my pictures when I post them. Also be warned that random posts may appear about school or my life in general.


I want to end each post, or just a once a week round up post, with something along the lines of a 'projects completed,' a 'works in progress,' and a 'projects to do' list, just to keep track of how much I actually have (or have not) done, this may or may not change in the future...so here is my current list that I hope to start tackling within the next two weeks - finals week is coming up so I must not allow myself to get sidetracked in the sewing room just yet!


Projects Completed

None!

Works in Progress

Purse (for my very patient sister) - my own design - black & white cotton butterfly print

Projects To Do

Pants - Vogue 2907 view B - grey suiting in stash
Dress - Coffee Date Dress, free Burda pattern - black/white silky print in stash
Peasant Top or Circle Shirt - pattern not chosen - teal paisley print in stash
Pants - Vogue 2907 view A - green suiting in stash
Purse (for a very deserving friend) - my own design - no fabric chosen yet
Men's Bi-Fold Wallet (requested by a friend) - my own design - no fabric chosen
Purse (for me) - my own design - no fabric chosen yet
Wallet (for me) - my own design - no fabric chosen yet
Dress - Simplicity 3506 view A - black/purple silky print in stash
8 Gore Skirt - self drafted pattern - cream suiting in stash
Top - princess seam bodice - red silky solid in stash
Bolero - Simplicity 3921 view ? - green velvety fabric in stash
School Bag/Backpack - my own design - no fabric chosen (decorator suede or a faux leather possibly)
Black & White Patchwork Maxi Skirt - summer swing skirt tutorial from Moda - no fabrics chosen
Top - Vogue 2987 top - multi-colored knit/jersey/stretchy in stash
Jacket - Vogue 2987 jacket - no fabric chosen
Dress - New Look 6020 view ? - no fabric chosen